


in this tutorial, we’re going to use Photoshop CS3 or Photoshop CS4
to create some really cool-looking effects to decorate our Typography.
We will be using a combination of layer styles, color blending, lens
flare and images. The end effect is quite stunning and hopefully you’ll
pick up some tips you didn’t know before.
Source : Inspiks
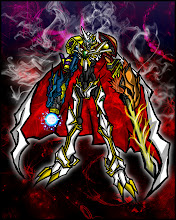
Final Image

Skill Level:
Intermediate
Resources:
Particles Pack by Media Melitia
Smoke Pack by Media Melitia
Hysteria Texture by Pareeerica
Rezland Font from Dafont
Step1:
Create
a new document in Photoshop, 1280×1024 pixels, 72dpi. We begin with a
radial gradient, by double clicking the layer to activate the Layer
Styles menu, then apply a gradient overlay. Here are the exact color
codes:
Foreground Color – #f2d445
Background Color – #98a843


Step2:
Next we will create our particle background. Open the Media Meltia Particles008.png image and drag it into your document, then apply a Color Dodge blend mode, name this layer “Particle1“.


Open the Media Meltia Particles006.png image and drag it into your document above the first particle layer, then apply a Color Dodge blend mode, name this layer “Particle 2″.

Scale the Particle 2 layer to fit the document size, by selecting the layer and clicking, Edit > Transform > Scale. Hold the shift key to scale the image proportionally.

Step 3:
Create your type by dragging the text tool to create a text box (Text box, gives you more control of your type).

Step 4:
Add some cool layer style effects by using the Blending Options (double click the layer to activate the Blending Options).

Layer Style 1 – Inner Shadow

Layer Style 2 – Outer Glow
Color Code: #f7db6a

Layer Style 3 – Gradient Overlay
Foreground Color – #918d14
Background Color – #fbfbfa

Layer Style 4 – Gradient Stroke
Foreground Color – #f8d04a
Background Color – #f6e6b5


Step 5:
We will now create some particle effects over the text. 1. Duplicate the “Particle 2″ layer and drag it above the text layer 2. Create a mask for the “Particle 2″ layer by clicking : Layer > Layer Mask > Hide All (if you do not see the layer mask feature in Photoshop CS3/CS4, click Window > Workspace > What,s New in CS3/CS4.
Step 6:
The
layer will seem to dissapear when you apply the layer mask, but do not
worry, it is still there, we will now reveal the layer by painting the
mask with a soft white paintbrush. Select the Brush Tool with Diameter 45pix and Hardness set to 0%.
Foreground Color – #ffffff
Background Color – #000000


Start
painting with your new soft white brush, the particles will begin to
appear, if you need to delete an already painted area, just switch the
brush color to black.
Step 7:
We will continue by adding some cool smoke effects over our text. Open the Smoke_V1_1071.jpg image and drag it above the particle mask layer. Scale the layer down to about 70-80% . Set the blending mode to Color Dodge.

Don’t
overdo the smoke effect, we just want it to compliment the particles,
so scale the smoke image down to a little further and use a soft medium
Eraser Tool to erase any sharp edges and place the smoke at some of the
bright white edges of the text, like the image below. Duplicated the
first smoke layer and re-size and rotate it for each placement.

Step 8:
Now
we will add some dramatic light streaks using Photoshop Lens Flare.
Create a new layer and color it 100% black with the paint bucket.
Click Filter > Render > Lens Flare.

Set the blending mode to Color Dodge
. 
Resize the lens flare layer vertically Edit > Transform > Scale, then reduce the lens flare size horizontally.

Rotate
the lensflare and place them around your text, as shown in the example
below. I duplicated my first lensflare to save time and resized a couple
of them a littl smaller at 48% opacity to create a sense of depth in
the scene. Don’t overdo the lens flare, the goal at this point is to
create balance and harmony with all the other elements.
. 
Step 9:
Create a new layer above the lensflares, and name it Vignette 1. Give it a radial gradient.
Foreground color – #0a5570
Background color – #ffffff

Set the Blending Mode to Multiply and the Opacity to 48% Create another layer and name it Vignette 2. Give it a transparent radial gradient.
Foreground color – #000000
Background color – #ffffff
Make the foreground transparent by, clicking on the gradient tool, then open the gradient preset.

Create the gradient, then give it a 22% Opacity,
use a large soft Eraser Tool brush to erase the middle portion of the
vignette, so your type remain nice and bright. You won’t see much of a
difference from the last vignette we did, The reason we did this step is
to make the edges of the image a little darker, so that our eyes focus
on the Type.

Step 10:
Create a new Color Balance Adjustment Layer by clicking the “half moon” symbol on the layer pallet.
Cyan -61
Magenta -38
Yellow +27

Create another Color Balance Adjustment Layer.
Cyan +100
Magenta -30
Yellow +1

Step 11:
Open the Hysteria Texture by Pareeerica, drag it above the color balance layers and set the Blending Mode to Hard Light. Change the Fill to 79%.
Final Image
Conclusion:
That’s
it, a cool-looking effect to enhance your Typography using some simple
Photoshop effects and color blending. The end of the tutorial was
achieved by experimenting with color balance. Try different color
combination’s, this can give you some surprisingly cool results. Have
fun!
And be not conformed to this world: but be ye transformed by the renewing of your mind, that ye may prove what is that good, and acceptable, and perfect, will of God. Romans 12:2
After Download, Unzip Zip files
0 komentar:
Posting Komentar