


Source : Slodive
- Software used: Adobe Photoshop
- Difficulty: Semi Advance
- Time: 2-3 Hrs
Before and After

Resources
Step 1
Open a new document with size 1600px x 1200px size and fill the BG layer with color code #4a5ef0.
Step 2
Now open your girl picture and cut out girl’s image from picture with the help of pen tool (P). You can also use Lasso tool (L) or Wand tool (W) as per your convenience.
Step 3
Paste the picture above your background layer. Name this layer ‘girl’.
Step 4
Manage some level of girl layer as below:
Step 5
Take your pen tool (P). Get a basic idea of where the fire is going to be. Keep in mind the dimension and action and make your fire. Take a new layer name it ‘fire’ and select that. Also take new path.
Step 6
Now you need to select a hard mechanical brush (B) with 3px diameter. Pick an orange color and give stroke to your path. To do so, right click on your work path and select stroke path.
Step 7
Erase the parts that are behind the body.
Step 8
Now apply some blending option to give more fire effect. Follow the setting as given below.


Step 9
After these effects you should have something like this.
Step 10
Duplicate your ‘fire’ layer, keep only the outer glow blending option, and remove the other two, i.e. inner shadow and inner glow.
Step 11
Change your blend mode to overlay. After this merge both fire layers (Ctrl + E) together.
Step 12
For more effect make some more paths on other leg by taking a new layer and a new path layer. Name this layer as ‘fire2’ and ‘path 2’ respectively.
Step 13
Repeat Steps 6 to step 11 on your new path- ‘path2’.
Step 14
Repeat Step 5 to step 11 for the Hands too.
Step 15
For some scattering effect take a new layer and brush (B) with 3px diameter and the following settings:
Step 16
Chose color orange and draw some scattering lines as below and apply the same settings as step 8 to Step 10. After merging layers, you can also apply these setting for a better effect.Step 17
By now you will be having an image something like this.
Step 18
Now when our foreground is ready, we can start working on our background. For my background I added a simple space picture with opacity 67% above background and below our girl’s image.
Step 19
For an added effect I made a few more changes.Copy your Space BG layer (Ctrl +J), keep it over your old layer and bring its opacity to 100%Go to Image> Adjustments> Hue/ Saturation (Ctrl + U), check on the colorize option on bottom right side and do the below mentioned changes.
Step 20
Change the blending mode of the image to Overlay.
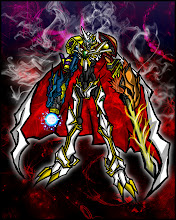
Final Image
And here is how the final image will look like.Download PSD

0 komentar:
Posting Komentar